


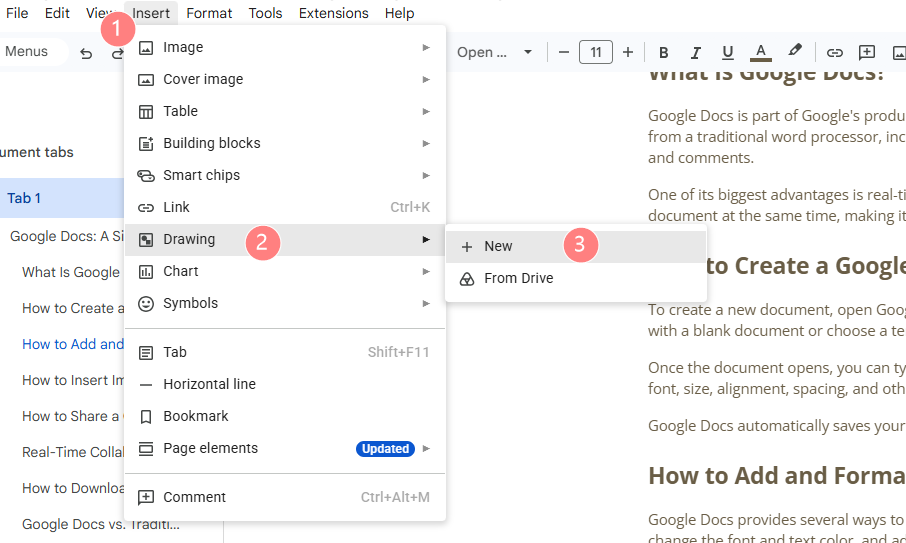
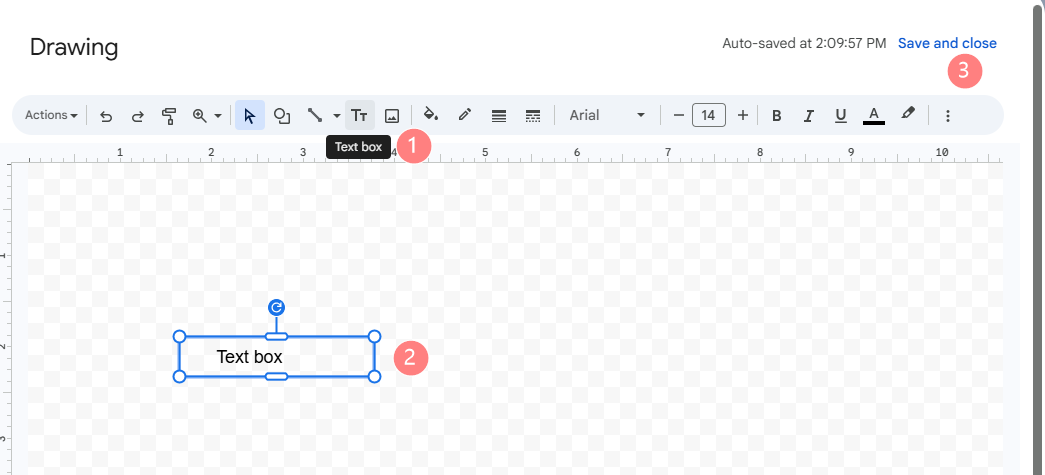
Quick Fix: Head to the top menu and click Insert > Drawing > New. Grab the Text box tool (the little square with a ‘T’ inside), drag out a shape on the grid, type your stuff, and hit Save and Close. Job done.
If you just moved over from Microsoft Word, this usually hits like a brick wall: Google Docs doesn’t actually have a simple “Insert Text Box” button sitting on its main toolbar. When you’re trying to put together a clean client report, draft a class syllabus with sidebars, or highlight key metrics, hunting through menus gets annoying pretty fast.
Here is how you actually get a text box onto your page, along with the workaround tricks Google doesn’t really explain until your document layout breaks.
Why Even Use a Text Box Here?
Most people don’t add text boxes just to make things look pretty. You reach for one when standard paragraph formatting gets in your way:
- Making callouts pop: Bold text gets lost in huge blocks of text. A standalone box pulls warnings, client quotes, or key figures right to the front.
- Keeping colored backgrounds contained: If you try shading regular text, Docs highlights the whole page margin. A text box keeps the color neatly inside a frame.
- Moving text wherever you want: Dragging notes around complex graphics or diagrams requires setting real layout rules.
- Building multi-column blocks: Quick team updates or executive summaries often need side-by-side blocks without messing up the main text underneath.
Method 1: The Native Way (Using the Drawing Tool)
If you need floating sidebars, tilted shapes, or text layered right over an image, this is your best option.
Step 1: Open the Canvas
Drop your cursor near the paragraph where you want the box. Go up to Insert > Drawing > New. A blank canvas window will pop up over your document.
Step 2: Draw the Box
Look at the canvas toolbar, click the Text box icon (a small square surrounding a capital ‘T’), click anywhere on the blank grid, and drag your cursor to form the box. Don’t worry too much about the exact size yet—you can stretch it later.
Step 3: Type and Format
Type your text straight into the box. Use the options at the top of the canvas to tweak things:
- Fill color: Click the Paint Bucket to swap plain white for gray or accent colors.
- Borders: Tweak the line thickness, dashed styles, or border color.
- Fonts: Change your font styles, text size, and centering.
Step 4: Save & Wrap Text
Hit Save and Close up in the right corner. Once the graphic drops onto your document, click it once to open the quick alignment menu below it. Change it from In Line to Wrap Text or In Front of Text. If you skip this, it will push your paragraphs around randomly.
Real-world issue: Text inside the Drawing tool gets treated like an image by Google Docs. That means built-in spellcheck won’t check it, and if your note runs past the bottom margin, it won’t break to page two—it just gets cut off.
Method 2: The Better Trick (Using a 1×1 Table)
If you want a simple summary box that expands naturally as you type and doesn’t act like a clunky floating graphic, a single-cell table works way better.
Step 1: Insert a 1×1 Grid
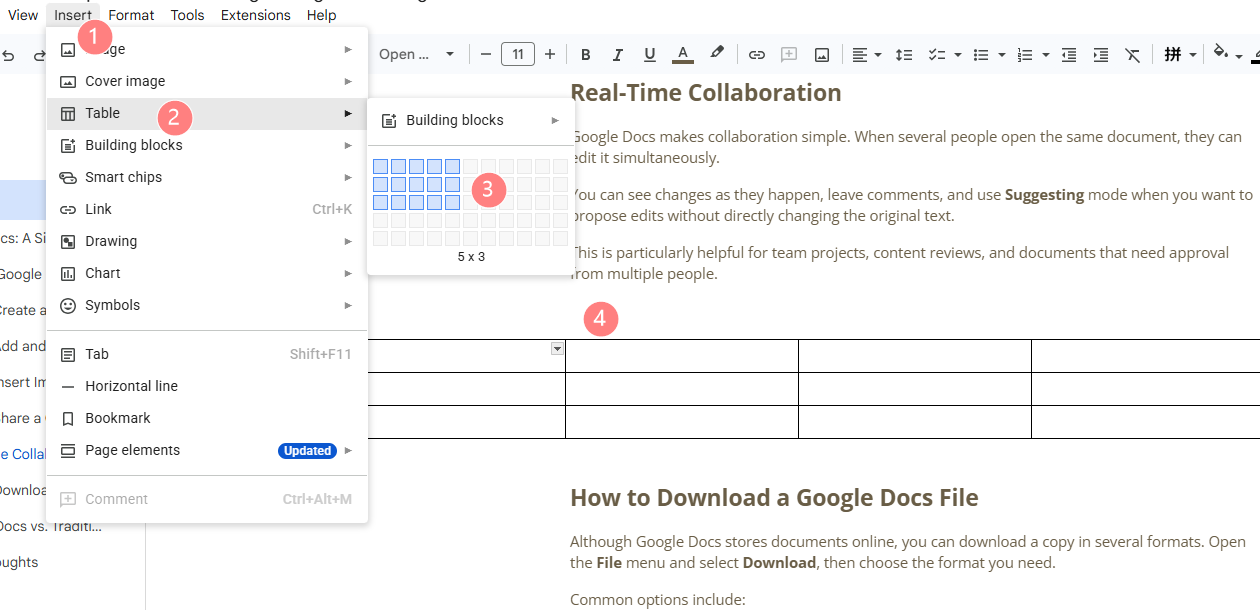
Go to Insert > Table in the top bar, then hover over just the top-left square to select 1×1 (one single box).
Step 2: Add Content & Adjust Width
Type your notes straight inside the box. Grab the left or right line with your mouse and drag it inward if you want a narrower box.
Step 3: Tweak Padding and Line Color
Right-click inside the box and hit Table properties (or use the shortcut border tools on the toolbar):
- Set Table border to
0ptif you don’t want any visible border line. - Pick a light background color under Cell background color.
- Increase Cell padding so your text isn’t pressed right against the edges.
Method 3: Doing It on Mobile (Android & iOS)
The mobile app leaves out the Drawing canvas entirely. If you are working on an iPad, iPhone, or tablet, the table trick is your only real route:
- Open your document in the app and tap the blue Edit (pencil) button.
- Tap the + (Plus) icon near the top.
- Select Table, set columns to 1 and rows to 1, then tap Insert Table.
- Type your text inside. Highlight the cell to change background colors or borders with the formatting bar.
Quick Comparison: Drawing Tool vs. Table Tool
| Feature | Drawing Tool Method | Table Tool (1×1) |
| Best Used For | Floating notes, angled text, placing text over images | Clean callout boxes, responsive notes, inline quotes |
| Page Splits | Fails (cuts off at the bottom of the page) | Breaks across pages naturally if text runs long |
| Editing Speed | Needs a double-click to open a pop-up window | Edit directly on the main page like regular text |
| Shapes & Angles | Full support (rotate text, speech bubbles, arrows) | Box shapes only |
| Mobile Editing | Read-only on mobile devices | Fully editable on phones and tablets |
Saving Your Doc as a PDF
When your text boxes are right where you want them, saving to PDF stops your layout from shifting around when you share it.
- Inside Google Docs: Click File > Download > PDF Document (.pdf).
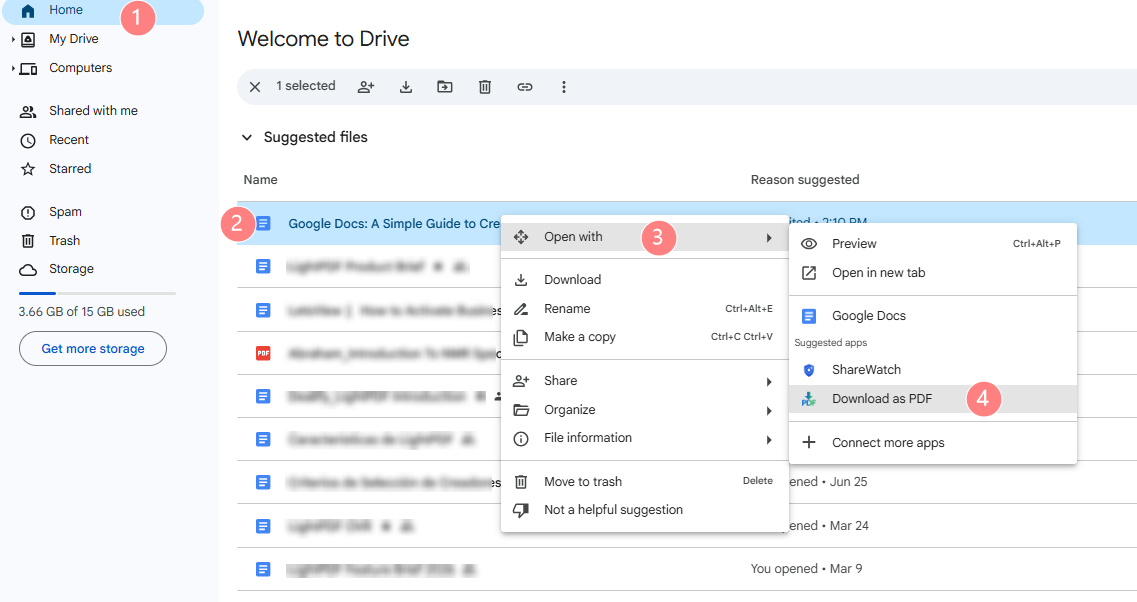
- From Google Drive: Find the doc in Drive, right-click it, and select Download. Drive turns it into a PDF automatically.
Bonus: Need to Add a Text Box Directly to a PDF?
If you already exported your file to PDF and realized you missed a quick footnote, you don’t have to convert it all back to Google Docs.
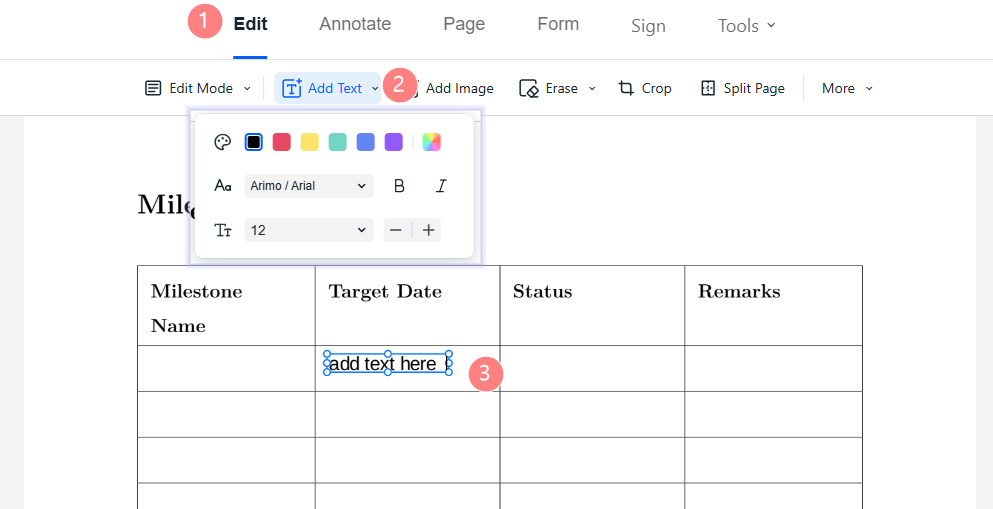
- Open the file in an online editor.
- Look for the Edit menu.
- Pick the Add Text tool, click on the page where you need it, and type your addition.
- Save your updated PDF.
FAQ
Q1: How do I make a text box transparent in Google Docs?
Double-click the box to open the Drawing canvas. Click the Fill color (Paint bucket) tool and pick Transparent. Do the same for the Border color if you want to get rid of the outer line completely.
Q2: Why can’t I click directly to edit my text?
If you used the Drawing tool, Docs handles the text box as a single image object. Double-click it to launch the Drawing window and edit your text there. If you want direct click-and-type editing, switch to the 1×1 Table method.
Q3: How do I move a text box freely around the page?
Click the text box once. In the small layout menu that appears underneath, change the text wrapping from In line to Wrap text or In front of text. You can then drag it around without pushing your text everywhere.
Q4: Can I put a text box over an image in Google Docs?
Yes. You can either paste your picture inside the Drawing canvas and place the text box on top, or set the text box wrapping to In front of text in your main document and drag it over your photo.
Q5: How do I delete a text box?
Click the outer edge of the text box once so the blue outline handles show up, then hit Backspace or Delete on your keyboard.




Leave a Comment